2015年11月30日月曜日

★ manjaro で uefi かつ btrfs ; fcitx も 大丈夫だ


 legasy (non UEFI) + btrfs


まず wifiを認識させます


これでインストール開始


日本語でインストールします


時刻です


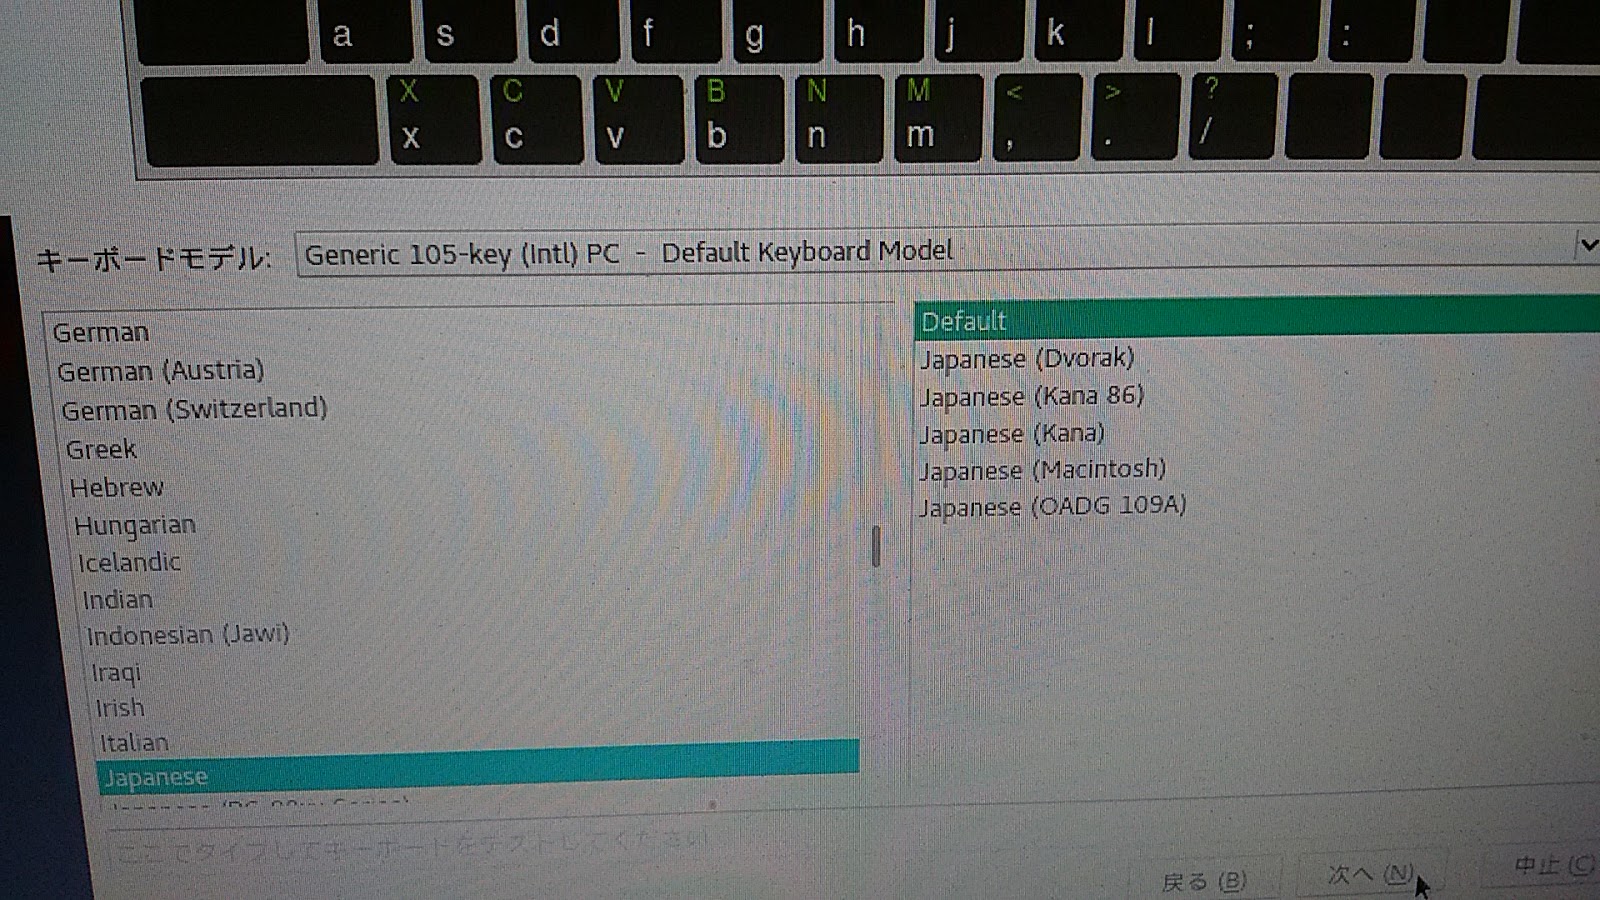
日本語キーボード


ここからが むずい


/dev/sdaが USBハードディスクです。
容量でわかります

 ブートローダーも /dev/sdaにいれなければなりません。
/dev/sda1は btrfs
/dev/sda2は   swap
です。
試行錯誤してたどりついてください


このあとは簡単です。


UEFI + btrfs です。

1) boot画面です

2)ただし 右下隅で wifi を接続したのち 以下のをクリックして インスト始めます。

3)USB ハードディスクにインストするので /dev/sdb を選びます

4)まず UEFIです
fat32
/boot/efi
esp
に注意


5)以下なふうにしました。 
swap は 2G位 とってください。

7)以下は再起動後の画面です
  まず wifi の設定です

8)pacman -S fcitx-im fcitx-configtool fcitx-mozc

nano /home/arch/.xprofile を
export XMODIFIERS=@im=fcitx
export GTK_IM_MODULE=fcitx
export QT_IM_MODULE=fcitx

のあと 右下のキーボードを右クリックしたらでます


再起動だけで いくようで
以下はまず不必要です

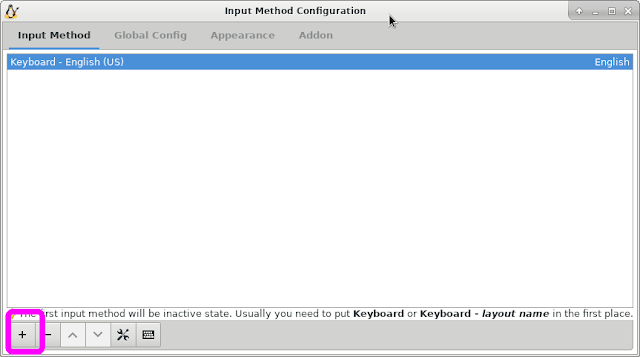
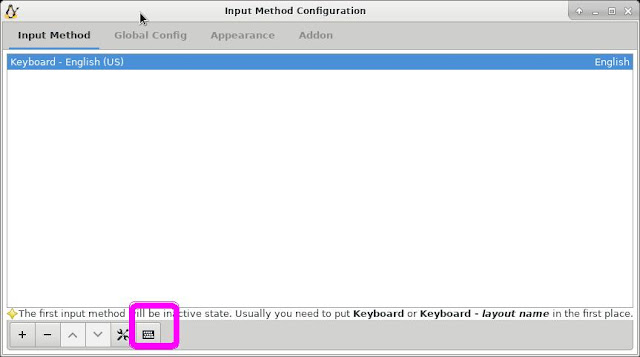
9)で まず右端のをクリックして


FluxBB bbcode test


10)それから 左の+をクリックして MOZCを選びます
FluxBB bbcode test


以上で 日本語入力までできました。

さて UEFI +BTRFS なmanjaroは 一体どうなってるのでしょう。


A) fdisk -l /dev/sdb
Disk /dev/sdb: 149.1 GiB, 160041885696 bytes, 312581808 sectors
Units: sectors of 1 * 512 = 512 bytes
Sector size (logical/physical): 512 bytes / 512 bytes
I/O size (minimum/optimal): 512 bytes / 512 bytes
Disklabel type: gpt
Disk identifier: 176D0FC1-E4B7-4F75-AF7E-8CA5689B7BEC

Device       Start       End   Sectors   Size Type
/dev/sdb1  1050624   1067007     16384     8M Linux swap
/dev/sdb2  1067008 312576671 311509664 148.6G Linux filesystem
/dev/sdb3     2048   1050623   1048576   512M EFI System


B)/boot/grub/grub.cfg
insmod part_gpt
insmod part_msdos
if [ -s $prefix/grubenv ]; then
  load_env
fi
if [ "${next_entry}" ] ; then
   set default="${next_entry}"
   set next_entry=
   save_env next_entry
   set boot_once=true
else
   set default="${saved_entry}"
fi
if [ x"${feature_menuentry_id}" = xy ]; then
  menuentry_id_option="--id"
else
  menuentry_id_option=""
fi
export menuentry_id_option
if [ "${prev_saved_entry}" ]; then
  set saved_entry="${prev_saved_entry}"
  save_env saved_entry
  set prev_saved_entry=
  save_env prev_saved_entry
  set boot_once=true
fi
function savedefault {
  if [ -z "${boot_once}" ]; then
    saved_entry="${chosen}"
    save_env saved_entry
  fi
}
function load_video {
  if [ x$feature_all_video_module = xy ]; then
    insmod all_video
  else
    insmod efi_gop
    insmod efi_uga
    insmod ieee1275_fb
    insmod vbe
    insmod vga
    insmod video_bochs
    insmod video_cirrus
  fi
}
set menu_color_normal=light-gray/black
set menu_color_highlight=green/black
if [ x$feature_default_font_path = xy ] ; then
   font=unicode
else
insmod part_gpt
insmod btrfs
set root='hd1,gpt2'
if [ x$feature_platform_search_hint = xy ]; then
  search --no-floppy --fs-uuid --set=root --hint-bios=hd1,gpt2 --hint-efi=hd1,gpt2 --hint-baremetal=ahci1,gpt2  866103fe-6597-4fbf-9e85-b1b5065c120b
else
  search --no-floppy --fs-uuid --set=root 866103fe-6597-4fbf-9e85-b1b5065c120b
fi
    font="/usr/share/grub/unicode.pf2"
fi
if loadfont $font ; then
  set gfxmode=auto
  load_video
  insmod gfxterm
  set locale_dir=$prefix/locale
  set lang=en_US
  insmod gettext
fi
terminal_input console
terminal_output gfxterm
insmod part_gpt
insmod btrfs
set root='hd1,gpt2'
if [ x$feature_platform_search_hint = xy ]; then
  search --no-floppy --fs-uuid --set=root --hint-bios=hd1,gpt2 --hint-efi=hd1,gpt2 --hint-baremetal=ahci1,gpt2  866103fe-6597-4fbf-9e85-b1b5065c120b
else
  search --no-floppy --fs-uuid --set=root 866103fe-6597-4fbf-9e85-b1b5065c120b
fi
insmod png
background_image -m stretch /usr/share/grub/background.png
if [ x$feature_timeout_style = xy ] ; then
  set timeout_style=menu
  set timeout=5
else
  set timeout=5
fi
menuentry 'Manjaro Linux' --class manjaro --class gnu-linux --class gnu --class os $menuentry_id_option 'gnulinux-simple-866103fe-6597-4fbf-9e85-b1b5065c120b' {
savedefault
load_video
set gfxpayload=keep
insmod gzio
insmod part_gpt
insmod btrfs
set root='hd1,gpt2'
if [ x$feature_platform_search_hint = xy ]; then
 search --no-floppy --fs-uuid --set=root --hint-bios=hd1,gpt2 --hint-efi=hd1,gpt2 --hint-baremetal=ahci1,gpt2  866103fe-6597-4fbf-9e85-b1b5065c120b
else
 search --no-floppy --fs-uuid --set=root 866103fe-6597-4fbf-9e85-b1b5065c120b
fi
echo 'Loading Linux 4.4.28-2-MANJARO x64 ...'
linux /boot/vmlinuz-4.4-x86_64 root=UUID=866103fe-6597-4fbf-9e85-b1b5065c120b rw  quiet splash resume=UUID=e029ea6e-971a-4ae1-a54e-1bed4f658057
echo 'Loading initial ramdisk ...'
initrd /boot/intel-ucode.img /boot/initramfs-4.4-x86_64.img
}


        mkdir /mb3
[BtrUefi fuji]# mount /dev/sdb3 /mb3
[BtrUefi fuji]# ls /mb3

EFI
[BtrUefi fuji]# ls -l /mb3/EFI/
total 8
drwxr-xr-x 2 root root 4096 11月  7  2016 boot
drwxr-xr-x 2 root root 4096 11月  7  2016 Manjaro
[BtrUefi fuji]# ls -l /mb3/EFI/Manjaro/
total 152
-rwxr-xr-x 1 root root 154624 11月  7  2016 grubx64.efi
[BtrUefi fuji]# ls -l /mb3/EFI/boot/
total 152

-rwxr-xr-x 1 root root 154624 11月  7  2016 bootx64.efi


[BtrUefi fuji]# mkdir /mb2
[BtrUefi fuji]# mount /dev/sdb2 /mb2
[BtrUefi fuji]# ls /mb2
bin   etc   lib64  mb2  opt   root-image-pkgs.txt  srv  usr
boot  home  ma6    mb3  proc  run                  sys  var
dev   lib   mb1    mnt  root  sbin                 tmp  xfce-image-pkgs.txt

となってます。

[BtrUefi fuji]# btrfs filesystem show
Label: none  uuid: 866103fe-6597-4fbf-9e85-b1b5065c120b
Total devices 1 FS bytes used 4.80GiB
devid    1 size 148.54GiB used 7.02GiB path /dev/sdb2


/etc/fstab 
UUID=635c5859-fff2-4b57-b578-47af4361ad80 swap           swap    defaults,noatime 0       0
UUID=ECBC-CE0A                            /boot/efi      vfat    defaults,noatime 0       2
UUID=e029ea6e-971a-4ae1-a54e-1bed4f658057 swap           swap    defaults,noatime 0       0
UUID=866103fe-6597-4fbf-9e85-b1b5065c120b /              btrfs   defaults,noatime,space_cache,autodefrag 0       1

arch そのものではありません。
./comment-out.bat /etc/pacman.d/mirrorlist | grep jp
Server = http://ftp.tsukuba.wide.ad.jp/Linux/manjaro/stable/$repo/$arch
Server = http://ftp.riken.jp/Linux/manjaro/stable/$repo/$arch

だからです。

ともかくとして manjaroで uefiでbtrfsのはできました。


以下はだいぶ前の記事です。
KVMでmanjaro動かしてみました。
qemu-system-x86_64 -enable-kvm -m $1 -hda $2 -net nic,macaddr=52:54:00:12:11:11 -net tap,ifname=tap0,script=/etc/qemu-ifup -smp cores=2


 1) /etc/pacman.d/mirrorlistの頭に
Server = http://manjaro.mirror.garr.it/mirrors/manjaro/stable/$repo/$arch
Server = http://mirror.nexcess.net/manjaro/stable/$repo/$arch

##
## Manjaro Linux repository mirrorlist
## Generated on 27 September 2015 08:38
##
## Use pacman-mirrors to modify
##


## Location  : Africa
## Time      :99.99
## Last Sync : 99:99
Server = http://mirror.is.co.za/mirrors/manjaro.org/stable/$repo/$arch

 かかないとアフリカにいってとんでもなく遅くなります


2) archと同じく topで2CPUを表示してくれます。
Tasks: 125 total,   1 running, 124 sleeping,   0 stopped,   0 zombie
%Cpu0  :   2.7/1.3     4[||                                                   ]
%Cpu1  :   0.7/0.7     1[                                                     ]
GiB Mem : 59.9/0.974    [                                                     ]
GiB Swap:  0.0/2.200    [                                                     ]

uname -ar
Linux man-pc 4.1.8-1-MANJARO #1 SMP PREEMPT Tue Sep 22 16:29:17 UTC 2015 x86_64 GNU/Linux
とカーネルがあたらしいせいでしょうか?


3)grub  でが ちょっと変わってます。
menuentry 'Manjaro Linux' --class manjaro --class gnu-linux --class gnu --class os $menuentry_id_option 'gnulinux-simple-bca56cba-b301-4f85-92b0-f88beb6bc7a7' {
    savedefault
    load_video
    set gfxpayload=keep
    insmod gzio
    insmod part_msdos
    insmod ext2
    set root='hd0,msdos1'
    if [ x$feature_platform_search_hint = xy ]; then
      search --no-floppy --fs-uuid --set=root --hint-bios=hd0,msdos1 --hint-efi=hd0,msdos1 --hint-baremetal=ahci0,msdos1  bca56cba-b301-4f85-92b0-f88beb6bc7a7
    else
      search --no-floppy --fs-uuid --set=root bca56cba-b301-4f85-92b0-f88beb6bc7a7
    fi
    echo    'Loading Linux 4.1.8-1-MANJARO x64 ...'
    linux    /boot/vmlinuz-4.1-x86_64 root=UUID=bca56cba-b301-4f85-92b0-f88beb6bc7a7 rw  quiet splash resume=UUID=79802035-9697-4a08-ae39-dda2efbb626e
    echo    'Loading initial ramdisk ...'
    initrd    /boot/intel-ucode.img /boot/initramfs-4.1-x86_64.img
}


ここで 
bca56cba-b301-4f85-92b0-f88beb6bc7a7 は  root の blkid

79802035-9697-4a08-ae39-dda2efbb626e は   swapの blkid
です


4)日本語化も簡単ですので 初心者はarchは manjaroからはいったほうがいいでしょう。


にがて 

別のパソコンへ クローンして起動 ( tar  で インストール )


以下のを繰り返すと 
インストールは必要なくなります。
tar での コピーでいいことになります。
ねc

確かに clonezillaをつかってもいいのですが、
DESKTOP lenovoを NOTE necに 物理的にくっつけるのは
無理なので usb HDD (いつものバックアップ先)を仲介させてます。

もちろん clonezillaで ローカルHDD ー> リモートHDDとネットを軽油することも
ありえますが、 遅いのではないかと考えました。


LENOVOのsda2にarch があってこれを NECのPCの sda6 に写します。
つまり クローンです。


 LENOVOのsda2  ー>USB HDDのsdb2  ー>NECのPCの sda6
 で 
 USB HDDのsdb2
 を仲介させてます。


1)まず  LENOVO USB HDDをつけます

 そしてarchでないLINUXを起動します。
(自分はdebiandogを起動)

 /mnt/sda2は  LENOVOの  /dev/sda2
 /mnt/sdb2は USB HDDの /dev/sdb2
です。

ここで

 ./comment-out.bat /Arch-backup.bat 
ーーーーーーーーーーーーーーーーーーーー
y='/mnt/sda2'
z='/mnt/sdb2/Arch-LENOBO-Backup'
mkdir -p $z
df
echo $y  '--->'   $z
echo ' push some key '

read $X
echo $X
cd $y
for x in bin boot  dev etc home  lib lib64 media opt proc root run sbin srv sys tmp usr var
do
(cd $y ; tar cvpf - $x)|( cd $z ; tar xpf -)
done


して、lenovo のarch を  usb HDD に写します。


実はこの灰色の部分は日頃してますので 新たな手間はかかってません。
だから ほんとは
 z='/mnt/sdb2/Arch-NEC-Backup-'`date +%m%d%H`
なのですが 
説明のため
z='/mnt/sdb2/Arch-LENOBO-Backup'
にしてます。 


2)lenovoから usb HDDを外し
これを nec にくっつけます。

 /mnt/sda6は NECの     /dev/sda6 
 /mnt/sdb2は USB HDDの /dev/sdb2 
となってます


(cd /mnt/sdb2/Arch-LENOBO-Backup ; tar cvpf - .)|(cd /mnt/sda6 ; tar - )
で ファイルが NECの/dev/sda6に 写ります。


3)/mnt/sda6/boot/grub/grub.cfg 
の書き換え

if [ -s $prefix/grubenv ]; then
  set have_grubenv=true
  load_env
fi
if [ "${next_entry}" ] ; then
   set default="${next_entry}"
   set next_entry=
   save_env next_entry
   set boot_once=true
else
   set default="0"
fi
if [ x"${feature_menuentry_id}" = xy ]; then
  menuentry_id_option="--id"
else
  menuentry_id_option=""
fi
export menuentry_id_option
if [ "${prev_saved_entry}" ]; then
  set saved_entry="${prev_saved_entry}"
  save_env saved_entry
  set prev_saved_entry=
  save_env prev_saved_entry
  set boot_once=true
fi
function savedefault {
  if [ -z "${boot_once}" ]; then
    saved_entry="${chosen}"
    save_env saved_entry
  fi
}
function recordfail {
  set recordfail=1
  if [ -n "${have_grubenv}" ]; then if [ -z "${boot_once}" ]; then save_env recordfail; fi; fi
}
function load_video {
  if [ x$feature_all_video_module = xy ]; then
    insmod all_video
  else
    insmod efi_gop
    insmod efi_uga
    insmod ieee1275_fb
    insmod vbe
    insmod vga
    insmod video_bochs
    insmod video_cirrus
  fi
}
if [ x$feature_default_font_path = xy ] ; then
   font=unicode
else
insmod part_msdos
insmod ext2
set root='hd0,msdos4'
if [ x$feature_platform_search_hint = xy ]; then
  search --no-floppy --fs-uuid --set=root --hint-bios=hd0,msdos4 --hint-efi=hd0,msdos4 --hint-baremetal=ahci0,msdos4  6c44812a-1341-4be3-ba69-704ff6ad1fae
else
  search --no-floppy --fs-uuid --set=root 6c44812a-1341-4be3-ba69-704ff6ad1fae
fi
    font="/usr/share/grub/unicode.pf2"
fi
if loadfont $font ; then
  set gfxmode=auto
  load_video
  insmod gfxterm
  set locale_dir=$prefix/locale
  set lang=en_US
  insmod gettext
fi
terminal_output gfxterm
if [ "${recordfail}" = 1 ] ; then
  set timeout=30
else
  if [ x$feature_timeout_style = xy ] ; then
    set timeout_style=menu
    set timeout=10
  else
    set timeout=10
  fi
fi
set menu_color_normal=white/black
set menu_color_highlight=black/light-gray
function gfxmode {
        set gfxpayload="${1}"
        if [ "${1}" = "keep" ]; then
                set vt_handoff=vt.handoff=7
        else
                set vt_handoff=
        fi
}
if [ "${recordfail}" != 1 ]; then
  if [ -e ${prefix}/gfxblacklist.txt ]; then
    if hwmatch ${prefix}/gfxblacklist.txt 3; then
      if [ ${match} = 0 ]; then
        set linux_gfx_mode=keep
      else
        set linux_gfx_mode=text
      fi
    else
      set linux_gfx_mode=text
    fi
  else
    set linux_gfx_mode=keep
  fi
else
  set linux_gfx_mode=text
fi
export linux_gfx_mode
menuentry 'Ubuntu-Bohdi' --class ubuntu --class gnu-linux --class gnu --class os $menuentry_id_option 'gnulinux-simple-6c44812a-1341-4be3-ba69-704ff6ad1fae' {
        recordfail
        load_video
        gfxmode $linux_gfx_mode
        insmod gzio
        insmod part_msdos
        insmod ext2
        set root='hd0,msdos4'
        if [ x$feature_platform_search_hint = xy ]; then
          search --no-floppy --fs-uuid --set=root --hint-bios=hd0,msdos4 --hint-efi=hd0,msdos4 --hint-baremetal=ahci0,msdos4  6c44812a-1341-4be3-ba69-704ff6ad1fae
        else
          search --no-floppy --fs-uuid --set=root 6c44812a-1341-4be3-ba69-704ff6ad1fae
        fi
        linux   /boot/vmlinuz-3.16.0-45-generic root=UUID=6c44812a-1341-4be3-ba69-704ff6ad1fae ro  quiet splash $vt_handoff
        initrd  /boot/initrd.img-3.16.0-45-generic
}
menuentry 'Windows 7 (loader) (on /dev/sda1)' --class windows --class os $menuentry_id_option 'osprober-chain-EAFCC37CFCC34195' {
        insmod part_msdos
        insmod ntfs
        set root='hd0,msdos1'
        if [ x$feature_platform_search_hint = xy ]; then
          search --no-floppy --fs-uuid --set=root --hint-bios=hd0,msdos1 --hint-efi=hd0,msdos1 --hint-baremetal=ahci0,msdos1  EAFCC37CFCC34195
        else
          search --no-floppy --fs-uuid --set=root EAFCC37CFCC34195
        fi
        parttool ${root} hidden-
        chainloader +1
}
set timeout_style=menu
if [ "${timeout}" = 0 ]; then
  set timeout=10
fi
menuentry ' DebianDog Jessie ' {
set root='hd0,msdos4'
linux  /live/vmlinuz1 root=/dev/sda4 noauto from=/ changes=/live/
initrd /live/initrd1.xz
}


menuentry 'Arch 64'   {
set root='hd0,msdos6'
linux   /boot/vmlinuz-linux root=/dev/sda6 rw quiet
initrd  /boot/initramfs-linux.img
}


if [ -f  ${config_directory}/custom.cfg ]; then
  source ${config_directory}/custom.cfg
elif [ -z "${config_directory}" -a -f  $prefix/custom.cfg ]; then
  source $prefix/custom.cfg;
fi


4)/mnt/sda6/etc/fstabの書き換え 

/dev/sda6       /        ext4      rw,relatime,data=ordered        0 1
/dev/sda5  none         swap    sw                0      0


5)qemu のために
/mnt/sda6/etc/netctl/bridge の書き換え


Description="Example Bridge connection"
Interface=br0
Connection=bridge
BindsToInterfaces=(enp0s25 tap0)
IP=dhcp


これで lenovo のが NECにクローンされました。
楽です。


2015年10月26日月曜日

arch linux qemu

石川や 浜の真砂は 尽きるとも
       世に盗人の 種は尽きまじ


qemuでインターネットです
まず バカチョンを 見せます 
 ctrl + alt + G でマウスの焦点を変えます

1) pacman -S qemu bridge-utils libvirt


2)  ifconfig をして下の黄色を変えます

cat /etc/netctl/bridge
Description="Example Bridge connection"
Interface=br0
Connection=bridge
BindsToInterfaces=(enp9s0 tap0)
IP=dhcp


3)
cat /etc/qemu-ifup
#!/bin/sh
echo "Executing /etc/qemu-ifup"
echo "Bringing up $1 for bridged mode..."
sudo /usr/bin/ip link set $1 up promisc on
echo "Adding $1 to br0..."
sudo /usr/bin/brctl addif br0 $1
sleep 2


chmod 750 /etc/qemu-ifup

 
4)
cat /etc/qemu-ifdown
#!/bin/sh

echo "Executing /etc/qemu-ifdown"
sudo /usr/bin/ip link set $1 down
sudo /usr/bin/brctl delif br0 $1
sudo /usr/bin/ip link delete dev $1


chmod 750 /etc/qemu-ifdown


 5)

qemu-img create -f qcow2 Q20.img 20G
 

 qemu-system-x86_64 -m 3072 -hda Q20.img -cdrom ./install60.iso  -boot d

modprobe tun
sysctl net.ipv4.ip_forward=1
systemctl start libvirtd
netctl start bridge


qemu-system-x86_64  -m 3072 -hda Q20.img -net nic,macaddr=52:54:00:12:11:11 -net tap,ifname=tap0,script=/etc/qemu-ifup


以上です。
ただ 上ではkvmは 使ってません。 

bios でkvmができるようにすると
  # modprobe -r kvm_intel 
  # modprobe kvm_intel nested = 1
したあと

qemu-system-x86_64  -m 3072 -enable-kvm  -hda Q20.img -net nic,macaddr=52:54:00:12:11:11 -net tap,ifname=tap0,script=/etc/qemu-ifup
となります


これから 詳しく書きます。
debian系は qemu kvm 簡単だけど archは難しい
GUIの virt-managet , gnome-boxes, qtemu はうまく動かない。

それで
http://lazy-dog.hatenablog.com/entry/2014/07/13/015538
をみたが、
自分のは dhcpcd なので
/etc/netctl/enp2s0_configがない。
それにかなり複雑である。

それで
https://wiki.archlinuxjp.org/index.php/QEMU の以下の部分へ逃げた。
------------------------------------------------------------------------------------------->

ブリッジを手動で作成する
おそらく一番よく使われている設定です。


この設定では、物理的なホストマシンと同一の Ethernet セグメントに、

直接外部ネットワークに仮想マシンが位置するようになります。

通常の Ethernet アダプタをブリッジアダプタで置き換えて、
通常の Ethernet アダプタをブリッジアダプタに bind することにします。

  • ブリッジを制御するための brctl が入っている bridge-utils をインストール。

  • IPv4 フォワーディングを有効にする:

# sysctl net.ipv4.ip_forward=1
変更を永続的にするために、/etc/sysctl.d/99-sysctl.confnet.ipv4.ip_forward = 0net.ipv4.ip_forward = 1 に変えます。

  • tun モジュールをロードして起動時にロードするように設定してください。詳しくはカーネルモジュールを参照。

  • ブリッジを作成します。詳しくは netctl でブリッジ接続を見て下さい。
    ブリッジの名前を br0 にするか、
    下のスクリプトを使用するブリッジの名前に忘れずに変更してください。

  • QEMU 用に root:kvm 750 パーミッションで tap アダプタを立ち上げるスクリプトを作成:

/etc/qemu-ifup

#!/bin/sh
  
echo "Executing /etc/qemu-ifup"
echo "Bringing up $1 for bridged mode..."
sudo /usr/bin/ip link set $1 up promisc on
echo "Adding $1 to br0..."
sudo /usr/bin/brctl addif br0 $1
sleep 2

  • Create the script that QEMU uses to bring down the tap adapter in /etc/qemu-ifdown with root:kvm 750 permissions:

/etc/qemu-ifdown

#!/bin/sh
 
echo "Executing /etc/qemu-ifdown"
sudo /usr/bin/ip link set $1 down
sudo /usr/bin/brctl delif br0 $1
sudo /usr/bin/ip link delete dev $1

----------------------------------------------------------------------<


これを元に始めます。

1)
pacman -S qemu bridge-utils libvirt


2)
qemu-img create -f qcow2 Q10.img 10G


3) install OS (cd is openbsd)
qemu-system-x86_64 -m 2048 -hda Q10.img -cdrom ./install60.iso  -boot d

4)
cat /etc/netctl/bridge
Description="Example Bridge connection"
Interface=br0
Connection=bridge
BindsToInterfaces=(enp9s0 tap0)
IP=dhcp


cat /etc/qemu-ifup
#!/bin/sh
echo "Executing /etc/qemu-ifup"
echo "Bringing up $1 for bridged mode..."
sudo /usr/bin/ip link set $1 up promisc on
echo "Adding $1 to br0..."
sudo /usr/bin/brctl addif br0 $1
sleep 2


chmod 750 /etc/qemu-ifup

cat /etc/qemu-ifdown
#!/bin/sh

echo "Executing /etc/qemu-ifdown"
sudo /usr/bin/ip link set $1 down
sudo /usr/bin/brctl delif br0 $1
sudo /usr/bin/ip link delete dev $1


chmod 750 /etc/qemu-ifdown


5) preparing to start

modprobe tun
sysctl net.ipv4.ip_forward=1
systemctl start libvirtd
netctl start bridge


6) ここは普通ですね
qemu-system-x86_64 -m 2048 -hda Q10.img \

-net nic,macaddr=52:54:00:12:11:11 \ 
-net tap,ifname=tap0,script=/etc/qemu-ifup


then openbsd start and is given address by router(192.168.1.1)
and can ping www.google.com.


internet
      |
 router
 192.168.1.1
      |
enp9s0 : dhcp---->br0 :192.168.1.226
|    arch 
|
tap
|
|
em0: 192.168.1.217
qemu:openbsd


7)but sometimes  arch itself cannot ping www.google.com.


this is trouble .
so in arch linux
netctl restart bridge


and then
arch  can ping www.google.com.

i found
(process:689): GLib-WARNING **: gmem.c:482: custom memory allocation vtable not supported
this may be the  necessity of  [ netctl restart bridge ]


どうなってるかというと
:::::::::::::::::::::::::::::::::::::::::::::::::::::::::::::::::::::::::::::::::::::::::::::::::::::::::::::::::::::::::::::::::::::::::::
in arch
ifconfig -a
br0: flags=4163<UP,BROADCAST,RUNNING,MULTICAST>  mtu 1500
        inet 192.168.1.226  netmask 255.255.255.0  broadcast 192.168.1.255
        inet6 2001:c90:8a71:c0d8:25e7:6897:2eb3:87dc  prefixlen 64  scopeid 0x0<global>
        inet6 fe80::21e:c9ff:fe05:78fc  prefixlen 64  scopeid 0x20<link>
        ether 00:1e:c9:05:78:fc  txqueuelen 0  (Ethernet)
        RX packets 10264  bytes 11209813 (10.6 MiB)
        RX errors 0  dropped 0  overruns 0  frame 0
        TX packets 4661  bytes 557618 (544.5 KiB)
        TX errors 0  dropped 0 overruns 0  carrier 0  collisions 0


enp9s0: flags=4419<UP,BROADCAST,RUNNING,PROMISC,MULTICAST>  mtu 1500
        ether 00:1e:c9:05:78:fc  txqueuelen 1000  (Ethernet)
        RX packets 10360  bytes 11401261 (10.8 MiB)
        RX errors 0  dropped 0  overruns 0  frame 0
        TX packets 4703  bytes 580080 (566.4 KiB)
        TX errors 0  dropped 0 overruns 0  carrier 0  collisions 0
        device interrupt 17 


lo: flags=73<UP,LOOPBACK,RUNNING>  mtu 65536
        inet 127.0.0.1  netmask 255.0.0.0
        inet6 ::1  prefixlen 128  scopeid 0x10<host>
        loop  txqueuelen 0  (Local Loopback)
        RX packets 989  bytes 189431 (184.9 KiB)
        RX errors 0  dropped 0  overruns 0  frame 0
        TX packets 989  bytes 189431 (184.9 KiB)
        TX errors 0  dropped 0 overruns 0  carrier 0  collisions 0


tap0: flags=4419<UP,BROADCAST,RUNNING,PROMISC,MULTICAST>  mtu 1500
        ether f2:3a:c6:2d:e7:4c  txqueuelen 500  (Ethernet)
        RX packets 65  bytes 9200 (8.9 KiB)
        RX errors 0  dropped 0  overruns 0  frame 0
        TX packets 1257  bytes 392221 (383.0 KiB)
        TX errors 0  dropped 0 overruns 0  carrier 0  collisions 0


in openbsd (the folowing is get by ssh -l XXX 192.168.1.217 on arch)

Last login: Mon Oct 26 18:51:11 2015 from 192.168.1.226
OpenBSD 5.7 (GENERIC) #738: Sun Mar  8 10:59:31 MDT 2015
Welcome to OpenBSD: The proactively secure Unix-like operating system.
Please use the sendbug(1) utility to report bugs in the system.
Before reporting a bug, please try to reproduce it with the latest
version of the code.  With bug reports, please try to ensure that
enough information to reproduce the problem is enclosed, and if a
known fix for it exists, include that as well.
$ su
Password:
# ifconfig -a                                                                                                               
lo0: flags=8049<UP,LOOPBACK,RUNNING,MULTICAST> mtu 32768
        priority: 0
        groups: lo
        inet6 fe80::1%lo0 prefixlen 64 scopeid 0x3
        inet6 ::1 prefixlen 128
        inet 127.0.0.1 netmask 0xff000000
 

em0: flags=8843<UP,BROADCAST,RUNNING,SIMPLEX,MULTICAST> mtu 1500
        lladdr 52:54:00:12:11:11
        priority: 0
        groups: egress
        media: Ethernet autoselect (1000baseT full-duplex)
        status: active
        inet 192.168.1.217 netmask 0xffffff00 broadcast 192.168.1.255
 

enc0: flags=0<>
        priority: 0
        groups: enc
        status: active
 

pflog0: flags=141<UP,RUNNING,PROMISC> mtu 33192
        priority: 0
        groups: pflog


最終的提案は


1) cat /etc/resolv.conf.head
nameserver 8.8.8.8


2) cat qemu-Memory-Image.bat

# modprobe kvm_intel nested=1
modprobe tun

sysctl net.ipv4.ip_forward=1
systemctl start libvirtd
netctl start bridge

qemu-system-x86_64 -enable-kvm -m 1024 -hda kvm.img -net nic,macaddr=52:54:00:12:11:11 -net tap,ifname=tap0,script=/etc/qemu-ifup

netctl restart bridge


すぐには host側で ping www.google.com ができず
時間遅れ 15秒位かが発生します

仮想化のネスト https://wiki.archlinuxjp.org/index.php/KVM

Nested Virtualization を使うことで、
元の仮想マシンやネットワークに修正を加えることなく
、既存の仮想マシンを 
別のハイパーバイザーや他のクラウド上で動作させることができるようになります。

ホスト側で、kvm_intel の nested 機能を有効にしてください:
# modprobe -r kvm_intel
# modprobe kvm_intel nested=1

永続化させるには (カーネルモジュール#モジュールオプションを設定するを参照):
/etc/modprobe.d/modprobe.conf
options kvm_intel nested=1

機能が有効になっているか確認:
$ systool -m kvm_intel -v | grep nested
    nested              = "Y"

次のコマンドでゲスト VM を実行してください:
$ qemu-system-x86_64 -enable-kvm -cpu host
VM を起動したら vmx フラグが存在するか確認:

$ grep -E "(vmx|svm)" /proc/cpuinfo


machine  translation


arch linux qemu


i follow  wiki.archlinuxjp.org/index.php/QEMU.
-------------------------------------------------- ----------------------------------------->

You want to create a bridge manually
Probably is the most well-used are set.
In this configuration, the same Ethernet segment and physical host machine,
Direct looks like the external network to a virtual machine is located.

By replacing the normal Ethernet adapter bridge adapter,
We decided to bind the normal Ethernet adapter to the bridge adapter.

  • To control the bridge brctl is in bridge-utils and install.

  • To enable IPv4 forwarding:

  # Sysctl net.ipv4.ip_forward = 1 
 
In order to make permanent changes, /etc/sysctl.d/99-sysctl.conf of net.ipv4.ip_forward = 0 the net.ipv4.ip_forward = 1 to change it to.

  • tun please be configured to load at startup by loading the module. For more kernel modules see.

  • It will create a bridge. For more information bridge connection in netctl see the.
    The name of the bridge br0 Either,
    Please change not forget the name of the bridge to be used under the script.

  • For QEMU root:kvm to create a script to launch the tap adapter at 750 permission:

  / Etc / qemu-ifup 

  #! / Bin / sh 
  
  echo "Executing / etc / qemu-ifup" 
  echo "Bringing up $ 1 for bridged mode ..." 
  sudo / usr / bin / ip link set $ 1 up promisc on 
  echo "Adding $ 1 to br0 ..." 
  sudo / usr / bin / brctl addif br0 $ 1 
  sleep 2 
 

  • Create the script That QEMU the uses to Bring down the tap adapter in /etc/qemu-ifdown with root:kvm 750 Permissions:

  / Etc / qemu-ifdown 

  #! / Bin / sh 
 
  echo "Executing / etc / qemu-ifdown" 
  sudo / usr / bin / ip link set $ 1 down 
  sudo / usr / bin / brctl delif br0 $ 1 
  sudo / usr / bin / ip link delete dev $ 1 
 

-------------------------------------------------- -------------------- <


It will start this to the original.

1)
pacman -S qemu bridge-utils libvirt


2)
qemu-img create -f qcow2 Q5.img 5G


3) install OS (cd is openbsd)
qemu-system-i386 -m 128 -hda Q5.img -cdrom / dev / sr0 -boot d


4)
cat / etc / netctl / bridge
Description = "Example Bridge connection"
Interface = br0
Connection = bridge
BindsToInterfaces = (enp9s0 tap0)
IP = dhcp


cat / etc / qemu-ifup
#! / Bin / sh
echo "Executing / etc / qemu-ifup"
echo "Bringing up $ 1 for bridged mode ..."
sudo / usr / bin / ip link set $ 1 up promisc on
echo "Adding $ 1 to br0 ..."
sudo / usr / bin / brctl addif br0 $ 1
sleep 2


cat / etc / qemu-ifdown
#! / Bin / sh
echo "Executing / etc / qemu-ifdown"
sudo / usr / bin / ip link set $ 1 down
sudo / usr / bin / brctl delif br0 $ 1
sudo / usr / bin / ip link delete dev $ 1


5) preparing to start

modprobe tun
sysctl net.ipv4.ip_forward = 1
systemctl start libvirt d
netctl start bridge


6) where it is the ordinary
qemu-system-i386 -m 128 -hda Q-5.img \
-net nic, macaddr = 52:54: 00: 12: 11: 11 \
-net tap, ifname = tap0, script = / etc / qemu-ifup


then openbsd start and is given address by router (192.168.1.1)
and I CAN ping www.google.com .

 
internet
|
router
  192.168.1.1
|
enp9s0: dhcp ----> br0: 192.168.1.226
|     arch
|
tap
|
|
em0: 192.168.1.217
qemu: openbsd


7) but sometimes arch Itself CAN not ping www.google.com .


this is trouble.
so in arch linux
netctl restart bridge

and then
arch CAN ping www.google.com .

i found
(Process: 689): GLib-WARNING **: gmem.c: 482: custom memory allocation vtable not supported
this may be the necessity of [netctl restart bridge]


If you say it and how are made
  :::::::::::::::::::::::::::::::::::::::::::::::::: :::::::::::::::::::::::::::::::::::::::::::::::::: :::::::::::::::::::::::::::::::::::::::
in arch
ifconfig -a
br0: flags = 4163 <UP, BROADCAST, RUNNING, MULTICAST> mtu 1500
inet 192.168.1.226 netmask 255.255.255.0 broadcast 192.168.1.255
inet6 2001: c90: 8a71: c0d8: 25e7: 6897: 2eb3: 87dc prefixlen 64 scopeid 0x0 <global>
inet6 fe80 :: 21e: c9ff: fe05: 78fc prefixlen 64 scopeid 0x20 <link>
ether 00: 1e: c9: 05: 78: fc txqueuelen 0 (Ethernet)
RX packets 10264 bytes 11209813 (10.6 MiB)
RX errors 0 dropped 0 overruns 0 frame 0
TX packets 4661 bytes 557618 (544.5 KiB)
TX errors 0 dropped 0 overruns 0 carrier 0 collisions 0

enp9s0: flags = 4419 <UP, BROADCAST, RUNNING, PROMISC, MULTICAST> mtu 1500
ether 00: 1e: c9: 05: 78: fc txqueuelen 1000 (Ethernet)
RX packets 10360 bytes 11401261 ​​(10.8 MiB)
RX errors 0 dropped 0 overruns 0 frame 0
TX packets 4703 bytes 580080 (566.4 KiB)
TX errors 0 dropped 0 overruns 0 carrier 0 collisions 0
device interrupt 17

lo: flags = 73 <UP, LOOPBACK, RUNNING> mtu 65536
inet 127.0.0.1 netmask 255.0.0.0
inet6 :: 1 prefixlen 128 scopeid 0x10 <host>
loop txqueuelen 0 (Local Loopback)
RX packets 989 bytes 189431 (184.9 KiB)
RX errors 0 dropped 0 overruns 0 frame 0
TX packets 989 bytes 189431 (184.9 KiB)
TX errors 0 dropped 0 overruns 0 carrier 0 collisions 0

tap0: flags = 4419 <UP, BROADCAST, RUNNING, PROMISC, MULTICAST> mtu 1500
ether f2: 3a: c6: 2d: e7: 4c txqueuelen 500 (Ethernet)
RX packets 65 bytes 9200 (8.9 KiB)
RX errors 0 dropped 0 overruns 0 frame 0
TX packets 1257 bytes 392221 (383.0 KiB)
TX errors 0 dropped 0 overruns 0 carrier 0 collisions 0

:::::::::::::::::::::::::::::::::::::::::::::::::: ::::::


in openbsd (the folowing is get by ssh -l XXX 192.168.1.217 on arch)

Last login: Mon Oct 26 18:51:11 2015 from 192.168.1.226
OpenBSD 5.7 (GENERIC) # 738: Sun Mar 8 10:59:31 MDT 2015
Welcome to OpenBSD: The proactively secure Unix-like operating system.
Please use the sendbug (1) utility to report bugs in the system.
Before reporting a bug, please try to reproduce it with the latest
version of the code. With bug reports, please try to ensure that
enough information to reproduce the problem is enclosed, and if a
known fix for it exists, include that as well.
$ Su
Password:
# Ifconfig -a
lo0: flags = 8049 <UP, LOOPBACK, RUNNING, MULTICAST> mtu 32768
priority: 0
groups: lo
inet6 fe80 :: 1% lo0 prefixlen 64 scopeid 0x3
inet6 :: 1 prefixlen 128
inet 127.0.0.1 netmask 0xff000000

em0: flags = 8843 <UP, BROADCAST, RUNNING, SIMPLEX, MULTICAST> mtu 1500
lladdr 52: 54: 00: 12: 11: 11
priority: 0
groups: egress
media: Ethernet autoselect (1000baseT full-duplex)
status: active
inet 192.168.1.217 netmask 0xffffff00 broadcast 192.168.1.255

enc0: flags = 0 <>
priority: 0
groups: enc
status: active

pflog0: flags = 141 <UP, RUNNING, PROMISC> mtu 33192
priority: 0
groups: pflog

:::::::::::::::::::::::::::::::::::::::::::::::::: :::


When you turn on the various OS
Might be lurking is Toka malicious something virus in it.
In observed in qemu.
impact on the mother ship if this would be unlikely.


The final proposal


1) cat /etc/resolv.conf.head
nameserver 8.8.8.8


2) cat qemu-Memory-Image.bat
# Modprobe kvm_intel nested = 1
modprobe tun
sysctl net.ipv4.ip_forward = 1
systemctl start libvirtd
netctl start bridge
qemu-system-x86_64 -enable-kvm -m 1024 -hda kvm.img -net nic, macaddr = 52: 54: 00: 12: 11: 11 -net tap, ifname = tap0, script = / etc / qemu-ifup
netctl restart bridge

You can not ping www.google.com in the host side immediately
Time delay of 15 seconds position or will occur

Nest of virtualization https://wiki.archlinuxjp.org/index.php/KVM

By using the Nested Virtualization,
Without modification to the original virtual machine and network
, An existing virtual machine  
And it will be able to operate on different hypervisor or other clouds.

On the host side, kvm_intel Please enable nested function of:
  # Modprobe -r kvm_intel 
  # Modprobe kvm_intel nested = 1

To perpetuate ( to set the kernel module # module options see):
  /etc/modprobe.d/modprobe.conf 
  options kvm_intel nested = 1

Check whether the feature is enabled:
  $ Systool -m kvm_intel -v | grep nested 
  nested = "Y"

Please run the guest VM with the following command:
  $ Qemu-system-x86_64 -enable-kvm -cpu host 
 
Check for vmx flag Once you start the VM is present:

  $ Grep -E "(vmx | svm)" / proc / cpuinfo 


2015年8月12日水曜日

dhcpd server にする、 grub

internet
|
wifi router
|
wlp0s29f7u1
arch
enp9s0:192.168.11.1
|
dhcp
debian

という構成です。
 

ifconfig enp9s0 192.168.11.1
でまず enp9s0
にアドレスをあてます。


それから dhcpd サーバーを構成します。
 /etc/dnsmasq.conf
server=/11.168.192.in-addr.arpa/8.8.8.8
interface=enp9s0
dhcp-range=192.168.11.50,192.168.11.150,12h


1行めで ネームサーバーを指定してます。


内のを外に出すために morizotを利用します

morizot.bat
SYSCTL="/sbin/sysctl -w"
IPT="/usr/sbin/iptables"
IPTS="/usr/sbin/iptables-save"
IPTR="/usr/sbin/iptables-restore"
INET_IFACE="wlp0s29f7u1"
LOCAL_IFACE="enp9s0"
LOCAL_IP="192.168.11.1"
LOCAL_NET="192.168.11.0/24"
LOCAL_BCAST="192.168.11.255"
LO_IFACE="lo"
LO_IP="127.0.0.1"
if [ "$1" = "save" ]
then
    echo -n "Saving firewall to /etc/sysconfig/iptables ... "
    $IPTS > /etc/sysconfig/iptables
    echo "done"
    exit 0
elif [ "$1" = "restore" ]
then
    echo -n "Restoring firewall from /etc/sysconfig/iptables ... "
    $IPTR < /etc/sysconfig/iptables
    echo "done"
    exit 0
fi
echo "Loading kernel modules ..."
/sbin/modprobe ip_tables
/sbin/modprobe ip_conntrack
/sbin/modprobe ip_nat_ftp
/sbin/modprobe ip_conntrack_ftp
/sbin/modprobe ip_conntrack_irc
if [ "$SYSCTL" = "" ]
then
    echo "1" > /proc/sys/net/ipv4/ip_forward
else
    $SYSCTL net.ipv4.ip_forward="1"
fi
if [ "$SYSCTL" = "" ]
then
    echo "1" > /proc/sys/net/ipv4/tcp_syncookies
else
    $SYSCTL net.ipv4.tcp_syncookies="1"
fi
if [ "$SYSCTL" = "" ]
then
    echo "1" > /proc/sys/net/ipv4/conf/all/rp_filter
else
    $SYSCTL net.ipv4.conf.all.rp_filter="1"
fi
if [ "$SYSCTL" = "" ]
then
    echo "1" > /proc/sys/net/ipv4/icmp_echo_ignore_broadcasts
else
    $SYSCTL net.ipv4.icmp_echo_ignore_broadcasts="1"
fi
if [ "$SYSCTL" = "" ]
then
    echo "0" > /proc/sys/net/ipv4/conf/all/accept_source_route
else
    $SYSCTL net.ipv4.conf.all.accept_source_route="0"
fi
if [ "$SYSCTL" = "" ]
then
    echo "1" > /proc/sys/net/ipv4/conf/all/secure_redirects
else
    $SYSCTL net.ipv4.conf.all.secure_redirects="1"
fi
if [ "$SYSCTL" = "" ]
then
    echo "1" > /proc/sys/net/ipv4/conf/all/log_martians
else
    $SYSCTL net.ipv4.conf.all.log_martians="1"
fi
echo "Flushing Tables ..."
$IPT -P INPUT ACCEPT
$IPT -P FORWARD ACCEPT
$IPT -P OUTPUT ACCEPT
$IPT -t nat -P PREROUTING ACCEPT
$IPT -t nat -P POSTROUTING ACCEPT
$IPT -t nat -P OUTPUT ACCEPT
$IPT -t mangle -P PREROUTING ACCEPT
$IPT -t mangle -P OUTPUT ACCEPT
$IPT -F
$IPT -t nat -F
$IPT -t mangle -F
$IPT -X
$IPT -t nat -X
$IPT -t mangle -X
if [ "$1" = "stop" ]
then
    echo "Firewall completely flushed!  Now running with no firewall."
    exit 0
fi
$IPT -P INPUT DROP
$IPT -P OUTPUT DROP
$IPT -P FORWARD DROP
echo "Create and populate custom rule chains ..."
$IPT -N bad_packets
$IPT -N bad_tcp_packets
$IPT -N icmp_packets
$IPT -N udp_inbound
$IPT -N udp_outbound
$IPT -N tcp_inbound
$IPT -N tcp_outbound
$IPT -A bad_packets -p ALL -i $INET_IFACE -s $LOCAL_NET -j LOG \
    --log-prefix "Illegal source: "
$IPT -A bad_packets -p ALL -i $INET_IFACE -s $LOCAL_NET -j DROP
$IPT -A bad_packets -p ALL -m state --state INVALID -j LOG \
    --log-prefix "Invalid packet: "
$IPT -A bad_packets -p ALL -m state --state INVALID -j DROP
$IPT -A bad_packets -p tcp -j bad_tcp_packets
$IPT -A bad_packets -p ALL -j RETURN
$IPT -A bad_tcp_packets -p tcp -i $LOCAL_IFACE -j RETURN
$IPT -A bad_tcp_packets -p tcp ! --syn -m state --state NEW -j LOG \
    --log-prefix "New not syn: "
$IPT -A bad_tcp_packets -p tcp ! --syn -m state --state NEW -j DROP
$IPT -A bad_tcp_packets -p tcp --tcp-flags ALL NONE -j LOG \
    --log-prefix "Stealth scan: "
$IPT -A bad_tcp_packets -p tcp --tcp-flags ALL NONE -j DROP
$IPT -A bad_tcp_packets -p tcp --tcp-flags ALL ALL -j LOG \
    --log-prefix "Stealth scan: "
$IPT -A bad_tcp_packets -p tcp --tcp-flags ALL ALL -j DROP
$IPT -A bad_tcp_packets -p tcp --tcp-flags ALL FIN,URG,PSH -j LOG \
    --log-prefix "Stealth scan: "
$IPT -A bad_tcp_packets -p tcp --tcp-flags ALL FIN,URG,PSH -j DROP
$IPT -A bad_tcp_packets -p tcp --tcp-flags ALL SYN,RST,ACK,FIN,URG -j LOG \
    --log-prefix "Stealth scan: "
$IPT -A bad_tcp_packets -p tcp --tcp-flags ALL SYN,RST,ACK,FIN,URG -j DROP
$IPT -A bad_tcp_packets -p tcp --tcp-flags SYN,RST SYN,RST -j LOG \
    --log-prefix "Stealth scan: "
$IPT -A bad_tcp_packets -p tcp --tcp-flags SYN,RST SYN,RST -j DROP
$IPT -A bad_tcp_packets -p tcp --tcp-flags SYN,FIN SYN,FIN -j LOG \
    --log-prefix "Stealth scan: "
$IPT -A bad_tcp_packets -p tcp --tcp-flags SYN,FIN SYN,FIN -j DROP
$IPT -A bad_tcp_packets -p tcp -j RETURN
$IPT -A icmp_packets --fragment -p ICMP -j LOG \
    --log-prefix "ICMP Fragment: "
$IPT -A icmp_packets --fragment -p ICMP -j DROP
$IPT -A icmp_packets -p ICMP -s 0/0 --icmp-type 8 -j DROP
$IPT -A icmp_packets -p ICMP -s 0/0 --icmp-type 11 -j ACCEPT
$IPT -A icmp_packets -p ICMP -j RETURN
$IPT -A udp_inbound -p UDP -s 0/0 --destination-port 137 -j DROP
$IPT -A udp_inbound -p UDP -s 0/0 --destination-port 138 -j DROP
$IPT -A udp_inbound -p UDP -s 0/0 --source-port 67 --destination-port 68 \
     -j ACCEPT
$IPT -A udp_inbound -p UDP -j RETURN
$IPT -A udp_outbound -p UDP -s 0/0 -j ACCEPT
$IPT -A tcp_inbound -p TCP -s 0/0 --destination-port 22 -j ACCEPT
$IPT -A tcp_inbound -p TCP -j RETURN
$IPT -A tcp_outbound -p TCP -s 0/0 -j ACCEPT
echo "Process INPUT chain ..."
$IPT -A INPUT -p ALL -i $LO_IFACE -j ACCEPT
$IPT -A INPUT -p ALL -j bad_packets
$IPT -A INPUT -p ALL -d 224.0.0.1 -j DROP
$IPT -A INPUT -p ALL -i $LOCAL_IFACE -s $LOCAL_NET -j ACCEPT
$IPT -A INPUT -p ALL -i $LOCAL_IFACE -d $LOCAL_BCAST -j ACCEPT
$IPT -A INPUT -p ALL -i $INET_IFACE -m state --state ESTABLISHED,RELATED \
     -j ACCEPT
$IPT -A INPUT -p TCP -i $INET_IFACE -j tcp_inbound
$IPT -A INPUT -p UDP -i $INET_IFACE -j udp_inbound
$IPT -A INPUT -p ICMP -i $INET_IFACE -j icmp_packets
$IPT -A INPUT -m pkttype --pkt-type broadcast -j DROP
$IPT -A INPUT -m limit --limit 3/minute --limit-burst 3 -j LOG \
    --log-prefix "INPUT packet died: "
echo "Process FORWARD chain ..."
$IPT -A FORWARD -p ALL -j bad_packets
$IPT -A FORWARD -p tcp -i $LOCAL_IFACE -j tcp_outbound
$IPT -A FORWARD -p udp -i $LOCAL_IFACE -j udp_outbound
$IPT -A FORWARD -p ALL -i $LOCAL_IFACE -j ACCEPT
$IPT -A FORWARD -i $INET_IFACE -m state --state ESTABLISHED,RELATED \
     -j ACCEPT
$IPT -A FORWARD -m limit --limit 3/minute --limit-burst 3 -j LOG \
    --log-prefix "FORWARD packet died: "
echo "Process OUTPUT chain ..."
$IPT -A OUTPUT -m state -p icmp --state INVALID -j DROP
$IPT -A OUTPUT -p ALL -s $LO_IP -j ACCEPT
$IPT -A OUTPUT -p ALL -o $LO_IFACE -j ACCEPT
$IPT -A OUTPUT -p ALL -s $LOCAL_IP -j ACCEPT
$IPT -A OUTPUT -p ALL -o $LOCAL_IFACE -j ACCEPT
$IPT -A OUTPUT -p ALL -o $INET_IFACE -j ACCEPT
$IPT -A OUTPUT -m limit --limit 3/minute --limit-burst 3 -j LOG \
    --log-prefix "OUTPUT packet died: "
echo "Load rules for nat table ..."
$IPT -t nat -A POSTROUTING -o $INET_IFACE -j MASQUERADE
echo "Load rules for mangle table ..."


 ./comment-out.bat /etc/grub.d/40_custom
exec tail -n +3 $0
menuentry 'openbsd ' {
    set root='hd0,msdos0'
    chainloader +1
}


menuentry 'Arch Linux, with Linux core repo kernel' --class arch --class gnu-linux --class gnu --class os $menuentry_id_option 'gnulinux-core repo kernel-true-ad4103fa-d940-47ca-8506-301d8071d467' {
    load_video
    set gfxpayload=keep
    insmod gzio
    insmod part_msdos
    insmod ext2
    set root='hd0,msdos2'
    linux    /boot/vmlinuz-linux root=/dev/sdb2 rw  quiet
    initrd    /boot/initramfs-linux.img
}


2015年6月10日水曜日

clamav

https://wiki.archlinux.org/index.php/ClamAV をみて

1) pacman -S clamav

2) freshclam

3)
WARNING: Clamd was NOT notified: Can't connect to clamd through /var/lib/clamav/clamd.sock: No such file or directory
がでたので
 
# touch /var/lib/clamav/clamd.sock
# chown clamav:clamav /var/lib/clamav/clamd.sock
 
4)もう一度 freshclam すると
 ClamAV update process started at Wed Jun 10 01:33:35 2015
main.cvd is up to date (version: 55, sigs: 2424225, f-level: 60, builder: neo)
daily.cvd is up to date (version: 20557, sigs: 1423118, f-level: 63, builder: neo)
bytecode.cvd is up to date (version: 256, sigs: 45, f-level: 63, builder: dgoddard)

5)で
wget -O- http://www.eicar.org/download/eicar.com.txt | clamscan -
したら 
 
 
stdin: Eicar-Test-Signature FOUND

----------- SCAN SUMMARY -----------
Known viruses: 3841799
Engine version: 0.98.7
Scanned directories: 0
Scanned files: 1
Infected files: 1
Data scanned: 0.00 MB
Data read: 0.00 MB (ratio 0.00:1)
Time: 40.088 sec (0 m 40 s)
なって clamscan の テストはOK。

 
6)# systemctl start clamd
Job for clamd.service failed. See "systemctl status clamd.service" and "journalctl -xe" for details.
といけない。


今 /etc/clamav/freshclam.conf は
DatabaseMirror database.clamav.net
NotifyClamd /etc/clamav/clamd.conf
 
また 今 /etc/clamav/clamd.conf は
LogFile /var/log/clamav/clamd.log
LogTime yes
PidFile /run/clamav/clamd.pid
TemporaryDirectory /tmp
LocalSocket /var/lib/clamav/clamd.sock
User clamav
 
 
しかし 再起動して
systemctl start clamd
がうまく動かない。


で clamd , clamdscan は 今はあきらめて


clamscan.bat (clamscanは遅いのですが)
 
 http://www.cloud-memo.com/2014/04/clamscan.html  をみて
 

#!/bin/sh
## Scan
clamscan -ri $1    > /var/log/clamav/scan.log
## Mail Send
cat /var/log/clamav/scan.log | mail -s "Scan Report" root@localhost
exit


http://www.kernel-panic.it/openbsd/mail/mail6.html
をみて
 
 
/etc/freshclam.conf
# Comment or remove the line below.
#Example
DatabaseDirectory /var/db/clamav
DatabaseOwner  _clamav
DNSDatabaseInfo  current.cvd.clamav.net
DatabaseMirror  db.it.clamav.net
DatabaseMirror  database.clamav.net
MaxAttempts  3
checks   24

/etc/clamd.conf
# Comment or remove the line below. 
#Example 
DatabaseDirectory  /var/db/clamav 
TCPAddr 127.0.0.1 
TCPSocket 3310 
User _clamav 
LogSyslog yes 
LogFacility LOG_MAIL

 
pacman -S cronie

crontab -eを
16 * * * * /usr/bin/freshclam >/dev/null 2>&1
とする。


2015年3月18日水曜日

エラー key firefox

1)
エラー: key "7A4E76095D8A52E4" could not be looked up remotely
エラー: キーリングに必要なキーがありません
エラー: 処理を完了できませんでした (予期しないエラー)
エラーが発生したため、パッケージは更新されませんでした。


https://archlinuxjp.kusakata.com/wiki/Pacman-key?rdfrom=https%3A%2F%2Fwiki.archlinux.org%2Findex.php%3Ftitle%3DPacman-key_%28%25E6%2597%25A5%25E6%259C%25AC%25E8%25AA%259E%29%26redirect%3Dno#5.E3.81.A4.E3.81.AE.E3.83.9E.E3.82.B9.E3.82.BF.E3.83.BC.E3.82.AD.E3.83.BC.E3.82.92.E6.A4.9C.E8.A8.BC.E3.81.99.E3.82.8B

をみて

# pacman-key --init
 
# pacman-key --populate archlinux
 
==> archlinux.gpg からキーを追加...
==> キーリングの信頼されたキーに署名...
  -> キーに署名 0E8B644079F599DFC1DDC3973348882F6AC6A4C2...
  -> キーに署名 684148BB25B49E986A4944C55184252D824B18E8...
  -> キーに署名 44D4A033AC140143927397D47EFD567D4C7EA887...
  -> キーに署名 27FFC4769E19F096D41D9265A04F9397CDFD6BB0...
  -> キーに署名 AB19265E5D7D20687D303246BA1DFB64FFF979E7...
==> 所有者信頼値をインポート...
==> キーリングの破棄されたキーを無効化...
  -> キー F5A361A3A13554B85E57DDDAAF7EF7873CFD4BB6 を無効化...
  -> キー 7FA647CD89891DEDC060287BB9113D1ED21E1A55 を無効化...
  -> キー D4DE5ABDE2A7287644EAC7E36D1A9E70E19DAA50 を無効化...
  -> キー BC1FBE4D2826A0B51E47ED62E2539214C6C11350 を無効化...
  -> キー 4A8B17E20B88ACA61860009B5CED81B7C2E5C0D2 を無効化...
  -> キー 63F395DE2D6398BBE458F281F2DBB4931985A992 を無効化...
  -> キー 0B20CA1931F5DA3A70D0F8D2EA6836E1AB441196 を無効化...
  -> キー 8F76BEEA0289F9E1D3E229C05F946DED983D4366 を無効化...
  -> キー 66BD74A036D522F51DD70A3C7F2A16726521E06D を無効化...
  -> キー 81D7F8241DB38BC759C80FCE3A726C6170E80477 を無効化...
  -> キー E7210A59715F6940CF9A4E36A001876699AD6E84 を無効化...
==> 信用データベースを更新...
gpg: 次回の信用データベース検査は、2016-01-22です

# pacman-key --refresh-keys


2)firefox 立ち上がらない 
pacman -Syuしよう。
operaをいれておこう。 


これでも 
 ●●●●●●●●●●●●
 $ firefox 
XPCOMGlueLoad error for file /usr/lib/firefox/libxul.so:
libvpx.so.2: cannot open shared object file: No such file or directory
Couldn't load XPCOM.


のときは


# cd /usr/lib/
# ln -s libvpx.so.1.3.0 libvpx.so.2